Thursday, March 17, 2011

Happy St. Patrick's Day!

Hope you are wearing green today so you won't get pinched!


Sunday, March 13, 2011

Thrift Store Lamp Makeover

Pottery Barn does it again darn it! I don't know why I get that catalog. It's a love/hate relationship. I love looking through it getting loads of inspiration, then get sticker shock looking at the prices.

For example. Finials. I love old finials. Love them. Do I have any? No. Does Pottery Barn have any? Yes!

Let's drool for a little bit shall we? All images courtesy of Pottery Barn.

Decorative Finials:


Lamp Finials:

Even a Coat Tree Finial:

Aren't they droolworthy? I thought so too, but I just can't justify the cost (unless I win the lottery of course).

So, I've been on the lookout for months for something to make my own finials out of. I've been stalking our local thrift stores for candle sticks or bed posts or fence posts or lamps or something.

Then one day it happened. I was walking around one of our local thrift stores and lo and behold I spotted this beauty for $1.50:


I should have taken a picture of it at the thrift store, but there were several people hanging around and I didn't want to waste any time in grabbing it. I mean, $1.50??  I grabbed and ran buddy. Grabbed. And. Ran. All's fair in thrifting.

I knew I didn't want to turn it into a finial lamp, though that would have been awesome too. Imagine my delight when I took it apart and found it was actually TWO pieces! Awesome went to awesomeR!


My friends, there are many tutorials in blog land on how to distress things. You can prime and plaster, paint and sand, etc. etc. These are ceramic, so all I did was take my trusty can of flat white interior paint and sloppy paint them. Sorry the pic is a tad blurry, I was just excited.


*Note, hammer was not needed for this project.

After they dried, I sanded some of the paint off here and there and voila! My finials! Aren't they pretty?


So, Pottery Barn finials for appromately $120 for both:


My finials, final cost $1.50 for both (already had the paint):


Here they are in their current spot on my mantel:


Next I'm looking forward to incorporating some green in there! C'mon spring!


Until next time,


Linking to these fabulous linky parties:

Monday, February 28, 2011

The Unveiling of the March Mantel!

Wow, can you believe March is here? February just seemed to fly by, probably because I was busy working on the March mantel which turned into a TOTAL redo!

First, I need to give credit where credit is due, I was so totally inspired by Donna's mantel gate over at Funky Junk Interiors. If you haven't seen it, quick, click this link because her gate is awesome!

Donna at Funky Junk Interiors Awesome Mantel Gate

Did you see hers? And you came back here? I'm honored, because usually I get lost over at her website and forget what I was doing.

Anyway, so all I had to say to my husband were those two sweet little words to get him to help me build a gate. Those sweet little words were "Power Tools."

Let's get this show on the road.  First we took an old pallet we got for free and put it on the back of the truck and began dismantling it:

That's our border collie mix, Gulliver. He wanted to help.

I decided I wanted my gate slats spaced apart and not butted together because I wanted more of an open, airy garden gate, so we spaced them evenly and added the cross bars of the "Z."


Yup, Gulliver is still there. I kept wondering why he was hanging around then saw the dog treat bag up in the truck. Oops!

After we spaced the slats so carefully, I realized we had to flip the whole thing over because I wanted to drill the screws in from the back so you wouldn't see them. Ah well.

After the top and bottom parts were screwed together, we added the middle cross bar.


Okay, confession time, after I took the above picture (by the way, that's hubby's arm), we realized the gate was too tall for above our mantel, so had to disassemble, cut off some more of the length and reassemble again. Measure twice, cut once anyone? Maybe next time.

Then I sloppy painted it with flat white paint. I wanted some of the natural wood showing through so didn't put too many coats of paint on.


After that I sanded the gate in spots to make it look more worn. Especially the upper right "grab to open" area.


See? Doesn't it look like we've been grabbing that corner of the gate for years to open it? After I was done sanding I added some gate hinges on the left side of the gate.

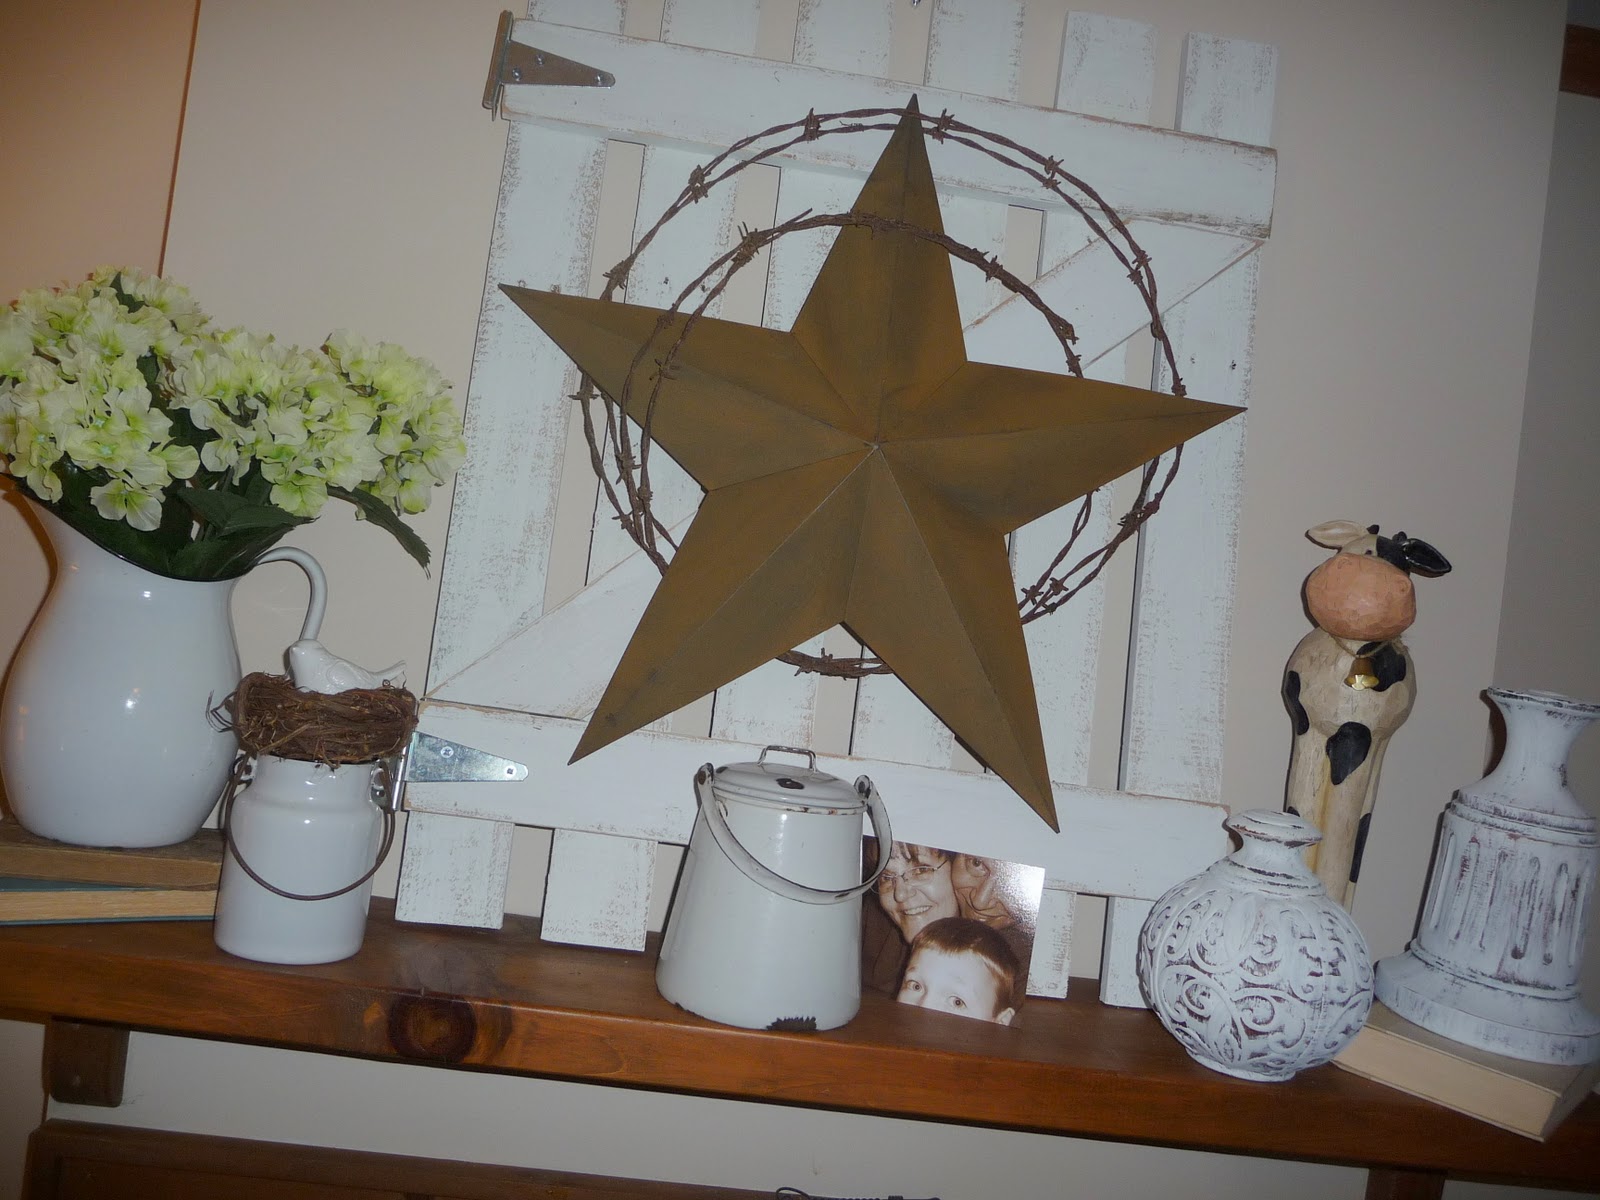
Time for the reveal! I found some barbed wire in my husbands shop area and took a metal star I've had for a while and decorated the front of the gate.


I LOVE LOVE LOVE IT!

For the rest of the mantel, I added a few pieces from my white enamelware collection and also some homemade finials I made (tutorial on those later this month).


Of course, I needed to work a bird in there, so a nest with a small ceramic bird sits on top of one of my enamelware buckets.


Homemade finials with a cow that was given to me by a friend a few years ago.

Now the mantel in its entirety:


My picture this month is just a silly shot of the 3 of us that I had printed in sepia.


Now the best part, my total cost this month was $14.50!
$3.00 for the flowers (1/2 price coupon at Dollar General), $5 for the gate hardware, $5 for the white paint and $1.50 for what I made the finials out of. Woo hoo! Under budget! Everything else I already had.


Thanks for looking!

Until next time,

3/7/11 update. Just found out that Linda over at Coastal Charm featured my mantel gate.  Wow! Thanks, Linda!

 http://linda-coastalcharm.blogspot.com/


Linking to these fun and fabulous linky parties:


Monday, February 21, 2011

Candle Holder turned Hurricane Lantern

Hi blogland friends!

I've been wanting to make a homemade hurricane lantern for quite some time.  I've had these candle holders (below, only one pictured, I have two) for about, hmmm, 15 years. They were given to me for free by someone who was redecorating and didn't want them (excuse the glass vase that wandered into the picture). Yes, our outlet is upside down. No, we didn't purposely do that, the person who lived here before us decided it would be fun to make ALL the outlets upside down. Um. Yeah.


 The candle holders are kind of fancy schmancy and never really fit in anywhere in my house so have been living up in the attic. Poor things. Well, plus, our local funeral home has the Same. Exact. Ones. Yikes. So... time for a revamp!

I've been wanting a hurricane lantern and have seen tutorials on them all around blogland, so decided to make my own. First I got out tools and took apart the candle holder. I really only wanted to use the bottom third of it.


Lots of fun pieces now!

I selected the pieces I wanted to use and spray painted them. Oil. Rubbed. Bronze.
Are you surprised? I'm so predictable. I'm surprised my blog isn't called "Shades of Brown" or something like that. Hey, I like that title! Hmmmmmm. Okay where were we? Oh yes, painting. Here's the picture.


Ohhh purdy!

Then I went and pulled out a bunch of different glass vases I had from various occassions and selected one and started epoxying. First, I had to glue the round flat piece to the vase:


I decided to flip it over and put a book on top for better drying.


Dry, dry, dry.


Time to glue the second piece.
 

The wa ai ting is the hardest part! Dry time that is.

But here it is finished! Yay! This is it decorated for my February mantel. But I will be able to use it in so many different places throughout the house. I'm charged!


Another pic.


Another angle.


So there you go!

From this:


To this:


My new hurricane lamp. Yay! Thanks for looking.

Until next time,


Linking to these parties:

Monday, January 31, 2011

A Year of Mantels - February

"All you need is love, all you need is love, all you need is love, love. Love is all you need."

So now that I have that tune stuck in your head, let's get the show on the road, it's time for the unveiling of the (drumroll please) February Mantel!

This month's mantel is brought to you by the letters "X" and "O" :-)

But before we get to that (geesh, I'm worse than a reality show host, huh?), let me admit that I did go over my $20 budget. Dagnabbit. But everywhere I went I just saw possibilities galore, and on sale to boot! That's my story and I'm sticking to it.

Items I bought:
Candlestick Topiary: $6.34 (cost to make)
"X" and "O" Wooden Letters: $2.49 each (Michaels)
White Ceramic Bird: $2.99 (Michaels)
Hardback Book: .12 at Thrift Store (75% off sale)
Berry Picks: .38 for 2 (90% off at Michaels)
Pink Christmas Bulbs: .42 for all 3 (90% off at Michaels)
Floral Picks: $3.00 for 2 at (75% off at Kmart)
Heart Picks: $1.00 (Dollar Tree)
Pink Feather Ornaments: $1.50 for 2 (75% off at Kmart)
Pink Glitter Pinecones: $1.50 (75% off at Kmart)
Music Paper Tree: $.75 (cost to make)
Pink Rose Petals: $1.00 (Dollar General)
Heart Box: .25 (Thrift Store)

Items Used But Already Had:
I love you stamp block. Picture frame and picture. Silver candlesticks. Tissue heart (made by my son in 1st grade). White glitter pom poms. Another book. Another ceramic bird. Hurricane lantern (just recently made, instructions will be posted at a later date). Paper and string for Valentine Paper Garland. Various ribbons.

Total spent on February mantel: $24.23
($4.23 over budget)

Okay, on with the show and tell:

Remember those cute Candlestick Topiary? Here they are on the mantel:


Here are two other projects on the February mantel I made but haven't blogged about yet (I will do some tutorials on them soon, I promies!) One is a music paper tree and the other a homemade hurricane lantern:


I should clue you in on something. I've decided that every month I will have a bird and a picture on the mantel. Had them in January's mantel and actually in February's I have two birds (and one picture). I wonder if you can guess what the picture will be of?

Here it is! Yup, me and my sweetie. Our wedding photo (1999). Don't we look all stiff and posed and unnatural? LOL! I don't care, I still love it, it was our wedding after all!


The "X" and the "O" were actually white until my spray paint can of Oil Rubbed Bronze got a hold of them. The tissue paper heart was made for me by my son when he was in 1st Grade.
Let's hear a collective "awwwwwwwwww."

Now some pictures of it as a whole (with the Valentine Paper Garland).

I feel like singing again.

"All  you need is love."
(and a little oil rubbed bronze)


"All you need is love."
(and a couple of thrift stores)


"All you need is love, love."
(and a hot glue gun)


"Love is all you need."
(and a family that humors you.)


Until next time :-)


Linking to these parties:

Sunday, January 23, 2011

Candlestick Topiary

Imitation is the sincerest form of flattery. I really really LOVED Jeana's Valentine Topiary over at In Place of her Crown. Did you take a peek? Aren't they pretty? So I knew I had to make a version of my own.

First I took these candlesticks I got at a thrift store and painted them. I call them my "wastic" candlesticks because honestly, I can't tell if they are some sort of plastic or wood, they are made out of a weird material and look like they were painted to look metal.


Bleh, huh? But I bought them because I knew they had potential.
I painted them a pearlescent ivory color, MUCH prettier as you'll see in the finished product.

I LOVE brown. Love love love brown. It's my favorite color, so I decided to make my topiary part of this project out of brown and pink fabric. Each topiary takes about a yard of fabric, so I used 1/2 yard of pink and a 1/2 yard of brown for each. I cut my fabric into 3" squares. I don't have pinking sheers so I just used regular scissors.


Then I just took a pencil and started poking the fabric into the styrofoam ball. It takes more fabric then you think it will, and least that's what I thought as I was cutting and poking away.


I did get a blister on my finger after poking two styrofoam balls full of fabic. But it's all for the crafting cause! Okay, so the story behind my styrofoam balls is I am cheap and styrofoam balls are pricey, at least to me they are. They are $3.50 for two of them at Walmart. What???? So, I went to the Christmas clearance section which is 90% off and found some yarn ball ornaments that had styrofoam balls inside. They are down to .20 each. I bought all they had (6) to use in future craft projects.

Back to the fabric poking. At the end I left a spot bare to poke into the candlestick where it will be sitting on top.


Then I just put it on the top of my candlestick, added some ribbon and fell in love...


Aren't they pretty???


Yes, I used two different color pinks in each one. Don't the wastic candlesticks look SO much better in that pretty pearl ivory? It's Rust-Oleum's Hammered Finished in Ivory. Love it! These will be on my February mantel for sure!

Items used and cost:
2 wastic candlesticks from thrift store: $1.00
2 styrofoam balls (Christmas ornaments on clearance): $.40
2 yards of fabic (brown and pink) from Walmart: $4.94
Rust-Oleum spray paint (already had)
ribbon (already had)

Total cost: $6.34


Until next time :-)


Linking to these parties:

Blog Archive